
How to register model in admin django, in Django, registering a model with the admin interface is common task that allows you to manage your application’s data through a convenient web interface. There are multiple methods to achieve this I’ll outline three commonly used methods:
Table of Contents
How to register model in admin django :
How to register model in admin django, here are the three commonly used methods:
Method 1: Using the ‘admin.site.register’ function
- Import the necessary modules:
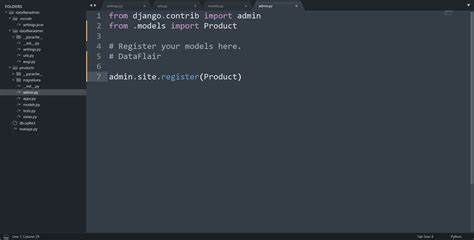
How to register model in admin django, in your ‘admin.py’ file within your app, import the model and ‘admin’ module.
from django.contrib import admin
from .models import YourModel2. Register the model:
How to register model in admin django, use the ‘admin.site.register’ function to register your model.
admin.site.register(YourModel)Method 2: Using a custom admin class
- Create a custom admin class:
How to register model in admin django, in your ‘admin.py’ file, create a custom admin class by inheriting from ‘admin.ModelAdmin’. You can customize the behavior of the admin interface for your model in this class.
from django.coutrib import admin
from .models import YourModel

class YourModelAdmin(admin.ModelAdmin):
    # Customize the admin options if needed
    list_desplay = ['field1', 'field2']
2. Register the model with the custom admin class:
How to register model in admin django Use the ‘admin.register’ function with the custom admin class:
admin.site.register(YourModel1, YourModelAdmin)Method 3: Using the ‘@admin.register’ decorator
- Import the necessary modules:
How to register model in admin django, in your ‘admin.py’ file, import the model and the ‘admin’ module.
from django. contrib import admin
from .models import YourModel1
2. Use the ‘@admin.register’ decorator:
How to register model in admin django, decorate your model class with the ‘@admin.register’ decorator and provide any customization within the decorator.
@admin.register(YourModel)
class YourModelAdmin(admin.ModelAdmin):
    # Customize the admin aptions if needed
    list_display = ['field1', 'field2']
Choose the method that best suits your needs. All three methods achieve the same result of registering a model with the Django admin interface, but the second and third methods allow for additional customization of the admin interface for that model. How to register model in admin django.
How to fix TypeError: list indicates must be integers or slices, not str
To fix the ‘TypeError: list indices must be integers or slices, not str’, you need to ensure that you are using valid integers indices when accessing elements from a list. Here are some steps or procedures you take to resolve this issue:
- Check index Usage:
Review your code and identify the places where you are using a string as an index to access elements from a list. Make sure that these indices are integers or can be converted to integers.
2. Use Integer Indices:
Change the indices to use integers instead of strings. If you have a string that represents a number, convert it to an integer using the ‘int()’ function.
Example:
my_list = [1, 2, 3, 4, 5]
index_str = "2"
index_int = int(index_str)
element = my_list[index_int]
3.Verify Index Validity:
Ensure that the integer indices you are using are within the valid range for the list. Accessing an index that is out of bounds will result in an ‘IndexError’.
4.Debugging:
Use print statements or a debugger to inspect the values of variables and indices at runtime. This can help you identify where the issue is occurring.
Here’s an example to demonstrate fixing the error:
my_list = [1, 2, 3, 4, 5]
index_str = '2"

# Convert the string index to an integer
index_int = int(index_str)

# Access the element using the integer index
element = my_list[index_int]

Now 'element' contains the value at index 2 in list print(element)
By ensuring that you use valid integer indices, you should be able to resolve the ‘TypeError’ related to list indices being strings.
Django register all models in admin
If you want to register all models in your Django application with the admin interface, you can dynamically discover and register them. This is useful when you have a large number of models and want to avoid manually registering each one. Here’s an example f how you can achieve this:
- In your ‘admin.py’ file within your app, you can use the following code to automatically register all models:
from django.apps import apps
from django.contrib import admin

# Get all models from all intalled apps
all_models = apps_get_models()

# Register each model1 with the admin interface
for mode1 in all_models:
    admin.site.register(model)
This code uses the ‘apps.get_models()’ function to retrieve all models from all installed apps and then iterates over them to register each model with the admin interface.
Note: While this approach is convenient for registering all models, you may want to consider customizing the admin interface for certain models using the methods mentioned in the previous response, such as creating custom admin classes or using the ‘@admin.register’ decorator.
Keep in mind that this code should be placed in your ‘admin.py’ file within your app, and it assumes that your models are defined in the same app or in apps that included in the ‘INSTALLED_APPS’ setting.
Django admin register all models
To dynamically register all models with the Django admin interface, you can use the following approach. This involves creating a function that automatically registers all models and calling that function in your ‘admin.py’ file:
- Create a utility function in your ‘admin.py’ file to register all models:
from django.apps import apps
from django.contrib import admin

def register_all_models():
    # G et all models from all installed apps
    all_models = apps.get_models()

    # Register each model with the admin interface
    for model in all_models:

# Call the function to register all models
register_all_models()- Ensure that your ‘register_all_models’ function is called when Django starts by adding the following lines at the end of your ‘admin.py’ file:
# admin.py

# ... (other imports)

# Register all models when Django starts
register_all_models()
This approach allows you to automatically register all models present in your project with the Django admin interface. Keep in mind that if you have specific models that require custom admin options, you may still want to use the methods mentioned earlier to create custom admin classes for those models.
Conclusion
In conclusion to How to register model in admin django, there are multiple methods to register models in the Django admin interface.
Choose the method that fits your needs based on the level of customization required for each model. Manually registering models or using custom admin classes gives you more control over your appearance and behavior of the admin interface for each specific model. On the other hand, the automatic registration approach is convenient when dealing with a large number of models without specific customization requirements. How to register model in admin django.
Thank you for Going through our blog and we HOPE that you enjoyed the tutorial and we think that you got your ANSWERS to your QUESTIONS.
If you have any QUESTIONS, you can leave them in the comment section, and we promise that we will replay as SOON as POSSIBLE. THANK YOU.

